

Always carry out a risk assessment before using your gazebo
These are not permanent structures and should be used with this in mind. Whilst we can test our Gazebos for fire and rain – our Commercial and Industrial ranges conform to British Standard 7837/1996, and are also fully waterproof – but wind is a different story. A test in a wind tunnel gives a steady blast of wind but that is not what happens in the real world. A windy day is about sudden, unpredictable gusts from all directions.
Our advice is that you must carry out a risk assessment on whether the wind is strong enough to lift the gazebo against your anchors. Pegs and guys are only as good as the ground they go into, whereas our HD straps will withstand up to 600KGs per strap. If the item the strap is attached to is firmly set on the ground, then this will make a significant difference to the amount of wind it is safe to leave the structure up in.
If you are caught out in the wind and need to take urgent action, we recommend you first lower the structure to its lowest point and adjust the straps. Closing the sidewalls will also prevent the wind from getting under the canopy and lifting this.
We also recommend that you take down the gazebo in the event that snow is forecast. Even a small amount of snow will add significant weight and could cause damage to both the canopy and frame if snow is allowed to collect on the canopy.
Every site is different and so the responsibility of ensuring the gazebo is sufficiently anchored down, and used within its limitations, always lies with the people erecting the outdoor structure. Gazebos should not be left unattended in case weather conditions change without warning. It is the users responsibility to determine whether it is safe to continue to use the gazebo in windy conditions.
Your Guide to Erecting Our Easifold Pop-up Gazebos
Compact Standard & Commercial Gazebo Models
Specific Instructions to set up the compact frame can be viewed here.
Regular Standard, Commercial & Industrial Frames
Erecting a Pop Up gazebo looks like a very simple process and it is. However this can be made even easier if you follow these few pieces of advice when you put your gazebo up for the first time.
Please read these special notes for our Industrial 4x4m, 4x6m & 4x8m before opening the frame.
When you first erect your gazebo, we would suggest you fix the canopy to the frame. Some frames have a hole for the mushroom and this helps to locate the canopy. For these, you need to remove the plastic mushroom from the top of the frame, place the canopy peak over the frame and then replace the mushroom by pushing it through the small hole in the canopy peak and locate back into the frame itself. This not only secures the canopy when folding it away, but also makes it waterproof at the peak.

Once the canopy is attached, you can set up your gazebo as follows:
1. Ideally choose a level piece of ground. If the ground is slightly uneven, you can compensate by adjusting the height of each of the legs.
2. Place the unopened frame and canopy in the centre of the space where you want your gazebo to stand. This will minimise the amount of moving around that you may need to do once the gazebo is fully erected.
3. Although the smaller Easifold gazebos can be erected by one person, it is much easier and quicker with 2 people. As a guide it will take approx 2 minutes with 2 persons but probably 4 – 5 minutes with one person.
4. The quickest way to erect a gazebo with 2 people is first open the frame to about 25% of full. With each person standing on opposite sides, bend down and grasp the V shape formed by the struts. Open the frame half way out by pulling two opposite legs away from each other. Place the canopy over the frame and align the corners with the corners of the frame.
5. Roll up all 4 corners of the canopy. Then grab the bottom of the concertina sections. With your partner on two opposite sides, lift slightly off the ground to prevent friction and walk away from each other. Then together lift the whole structure upwards, at the same time walking backwards as the frame opens out. Keep lifting and shaking the frame until it is as fully extended as possible.
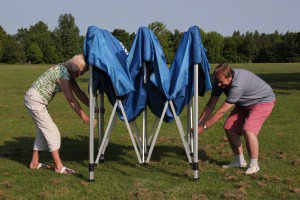
6. The roof slider should now be close to the locking hole at the top of each leg. If it not, then you need to walk around the frame lifting the roof strut upwards at the same time as pulling the frame outwards. This may take a few circuits but it is very important to get the slider as near as possible to the locating hole because once you start to push the roof strut upwards so that it locks into the hole, there is maximum pressure on the side scissor struts. Lock all corner sliding joints into position.
7. Sometimes it can be physically quite hard to push the struts up the leg to get the pull pin to locate into the securing hole which then locks the frame into its rigid position. One way of making this slightly easier is to put your shoulder over the top of the leg and lever the struts upwards as you push down with your shoulder. It is even easier if you place a towel or cushion between your shoulder and the leg to give extra cushioning. If you are not quite tall enough to put your shoulder over the top of the leg, then use a box or step to stand on. This will help greatly with the leverage.
8. The roof canopy is designed to fit snugly over the frame so that it is taught with no sagging. This sometimes makes it harder to push the slider upwards to lock the frame. This can be made easier if you peel back the canopy from the tops of the legs. Then once all four struts are properly secured, simply pull the canopy corners back over the frame corners.
Erecting the gazebo with one person – Smaller Gazebos only
Although it will take slightly longer to erect an Easifold gazebo with one person, it is still an easy process!
1. Position the gazebo centrally to where you want it located.
2. Walk around the frame lifting up each roof strut which is attached to the leg, at the same time pulling the frame outwards.
3. When it is approx 50% erected, go underneath the canopy and grasp the central roof strut assembly. Then lift the whole structure off the ground which will allow the legs to extend outwards. This tip is really only applicable to 3m x 3m and 3m x 4.5m frames.

4. Once the frame is extended as far as it will go, walk around the gazebo lifting the roof struts up the legs as above until the retractable pins are near enough to be pushed into the retaining holes at the top of each leg. This may take up to 3 or 4 circuits of the gazebo.
5. For a 3m x 6m frame, it is impossible to lift the whole structure when only one person is doing the work. So the only way to secure the frame is to walk around the gazebo lifting each strut up the legs until you are able to push the slider up and lock the retractable pin into the retaining hole at the top of the leg.
Once the frame is fully locked, the legs need to be extended to the required height.
Fixing the walls
1. Fixing the wall panels to the gazebo frame is a very simple process. Once you have decided where you want each wall panel to be fitted, ie door panel at the front, windows at the sides etc, start at one corner making sure that the Velcro strips on both the top edge of the wall panel and the inside of the canopy valance are lined up exactly opposite each other. If not you will find that when you get to the last wall panel it is either too long or too short so will not fit correctly to the frame legs.
2. The wall panels zip together at the corners. It is best to fit one wall panel at a time and only then attach the next panel to it using the zip fastener.
3. Most wall sets are designed to fit tightly around the frame so that there is little or no movement in the material when the wind blows. Care therefore needs to be taken to ensure that the Velcro strips at the tops of the wall panel and the canopy are matched exactly so that when the last wall panel is zipped to the first one, there is not excessive pressure on the wall material or the zip fastener.
4. You will find that when your gazebo is first supplied, the walls are neatly packed in the storage bag supplied. But once you have taken all the walls out of the bag, fixed them to the gazebo frame and then taken them down again, they rarely fit back into the original storage bag, that is unless you are very good at folding them up again! The solution is to buy a second and larger storage bag in which to put some of the folded wall panels. Even an old suitcase can provide the perfect wall panel storage bag!
Taking down your gazebo
Strangely enough this is almost the same process as for erecting your gazebo but in the reverse order! However, this process, if not done correctly, often results in the most instances of damage because too often people are in a rush to get the gazebo down and packed away and do not think of some important points that must be done. These are:
Make sure you undo the canopy velcro fasteners before you begin collapsing the frame itself. Failure to do this can result in either bent struts or torn holes in the canopy where the velcro fittings are attached.
Ensure that all pull pins are extracted from the leg holes before beginning to push the frame together. Only then can each leg be pushed towards the centre until the frame is back to its storage size.
Remember that if resistance is felt during this process then probably either of the 2 actions above have not been done properly with the possiblility that damage might result to the frame structure. Once fully collapsed, the frame can then be put away into its storage bag ready for the next time it it used.
Security
It cannot be emphasised strongly enough how important it is to ensure that the gazebo is properly tethered to the ground. If the gazebo is standing on a soft surface ie lawn or field, then at a minimum, it should be secured with pegs and guy ropes that should always be supplied when first purchased. But even then it is advisable to add additional weight to the bottom of each leg and / or attach ratchet straps and sturdy pegs. Then if the weather conditions should change unexpectedly, you have the maximum possible security to stop your gazebo cartwheeling across the showground and possibly inflicting some costly damage on someone’s expensive vehicle.
You must judge whether it is safe to use your gazebo in windy conditions.
Of course, if your gazebo is standing on tarmac or similar, then leg weights are essential because the guy ropes and pegs cannot be used.
Leg weights come in two types:

Heavy Duty weights. These come with a U groove which fits over the leg base plate – ideal for when your gazebo is on hard standing. Each leg provides 12 kg of extra weight for added security.
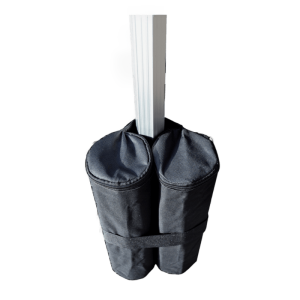
Sand Bags. These are purpose made sand bag sets which, when filled with either sand or shingle, are bound round the bottom of the leg using Velcro straps. Each sandbag gives 5kgs of weight when filled per gazebo leg.

Ratchet Straps & Heavy Duty Pegs These kits have lightweight yet strong ratchet straps and robust pegs. Ideal to give your gazebo further support in addition to the standard guy ropes and pegs provided.
Whatever type of gazebo you have, and whichever surface it stands on, you can never have too much security. Investing in weights or ratchet straps is the best way to ensure that your impressive gazebo does not end up as a tangled mass of metal in a skip!
Not sure which is the right gazebo for you? Check out our buying guide here.